My Experience Using a Split Keyboard
My Experience
After nearly two months of consistent mechanical split keyboard use, I’m finally ready to share my impressions of this unique keyboard experience.
What is a Split Keyboard?
A split keyboard is a type of ergonomic mechanical keyboard that separates keys into two distinct halves, allowing for a more natural hand, wrist, and shoulder position. Unlike traditional keyboards, split keyboards can be adjusted to various angles and distances, helping to reduce strain and improve typing posture.
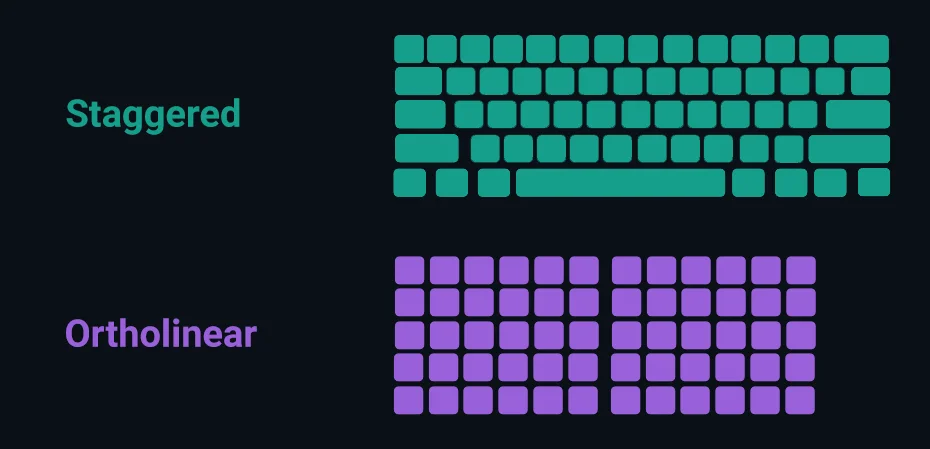
Most split keyboard are ortholinear, which means they use equally sized keys that are laid out in a uniform grid, rather than the staggered design you see in typical QWERTY keyboard layouts.
Often split keyboards are also smaller in size compared to standard keyboards. If a keyboard is typically comprised of your standard keys, modifiers, a number row, function row, navigation, arrows, and a numpad, split keyboard may only be 75% or even as 40% of the size.
If you’re interested, Keebio did a great writeup on mechanical keyboards for beginners and goes into more specifics here: First-Timers Guide to Mechanical Keyboards
Benefits of Using a Split Keyboard
Using a split keyboard comes with several advantages:
- Ergonomics: By allowing a more natural position for your hands and shoulders, split keyboards help prevent carpal tunnel syndrome, wrist pain, and other repetitive strain injuries.
- Customization: They offer extensive customization options, including programmable keys, layers, and macros - but also more hardware options like custom switches, key caps, hand rests, tenting kits, and LED lights.
- Functionality: With features like key layers and macros, users can increase their productivity by having quick access to frequently used functions.
- Space Efficiency: Split keyboards often take up less desk space compared to traditional keyboards, or even just allow you to use your space in a smarter way. I’ve seen a couple of users talk about how they enjoy using the space between their keyboard halves for their coffee cups.
What I Used Before
Before switching to a split keyboard, I was using a WASD mechanical keyboard purchased in 2018. I removed the letters to cement my already instantiated touch-typing habits. Here’s exactly how I had customized it:
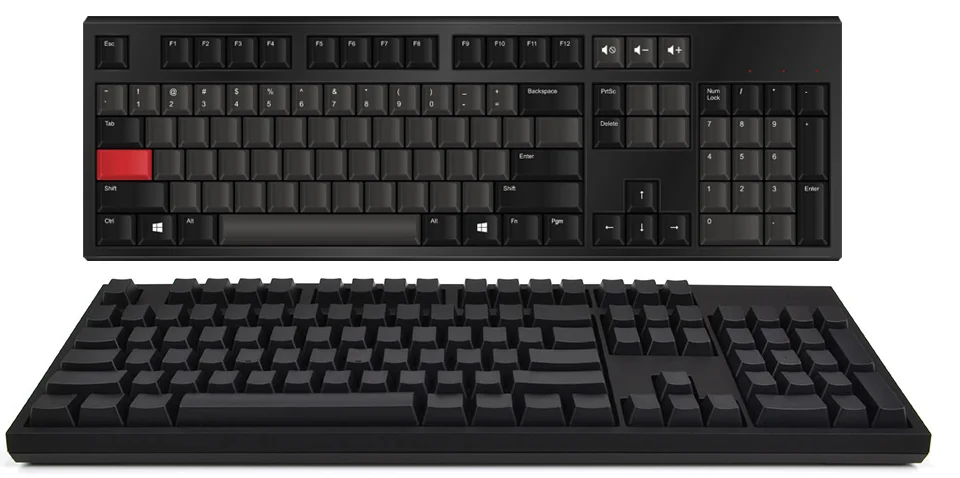
I had some macros setup and it served me well for 5 years, but near the end I started noticing discomfort particularly on my wrists. I bought some wrist rests which helped a bit but wondered if there was something better out there.
Upon learning more about unique keyboard designs, I started to consider how a better layout may serve me better - and for example, I realized my right thumb was not being used for anything. Yes, I’m a weird left-thumb-only spacebar typer. This inspired me to get something new.
My Desired Use Case
I wanted a keyboard that could better utilize my right thumb and provide key clusters for additional functionality for my thumbs in general (thumbs are your strongest finger, why are they so underutilized on most keyboards?!). My goal was to have a more ergonomic setup that could help reduce strain and improve my PC-use efficiency.
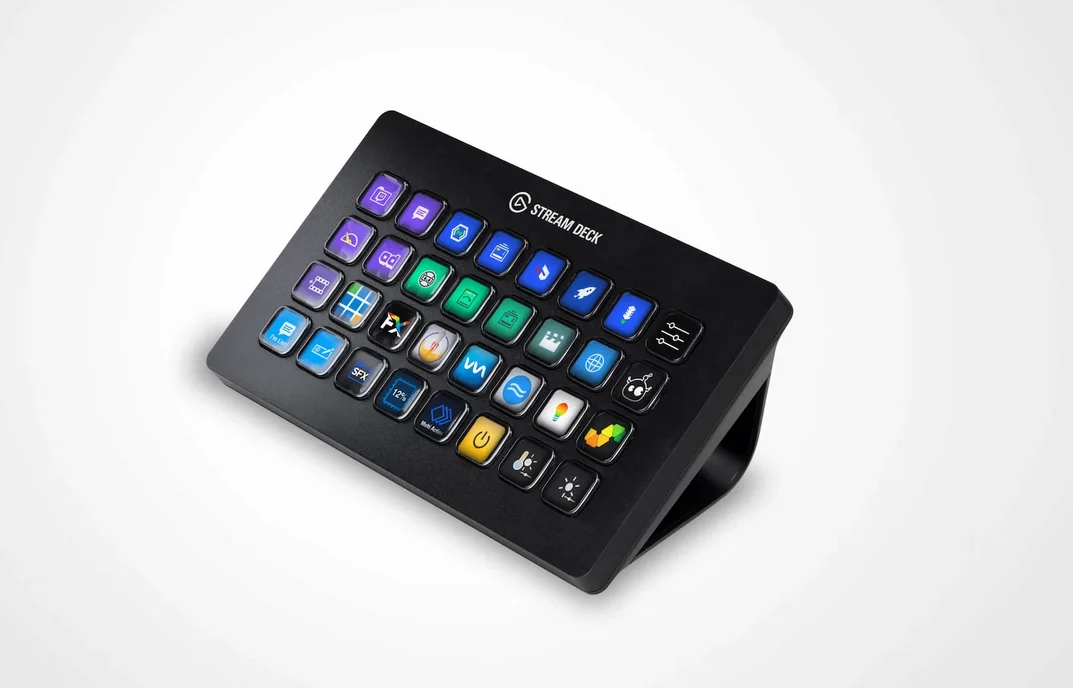
Because I already had a Stream Deck XL for live streaming, I knew using a keyboard with fewer keys wouldn’t be a problem.
The utility of the Stream Deck is a blog post all on its own. Maybe I’ll work on that next!
The Spit Keyboard I Ended Up Buying
I decided on the Ultimate Hacking Keyboard V2. It used a more traditional staggered key layout so it would be comfortable enough for my existing muscle memory, but allowed both a split configuration or the option to join the two halves together.
I bought two rubber hand rests, a key cluster for my left side, and a trackball module for my right side. Key cluster was an obvious purchase, for anyone considering this keyboard this should be a no-brainer. But I wasn’t quite as sure about the trackball. I think if there was an option for a right-side key cluster I would have gotten that instead.
This purchase was not cheap - but I was hoping this would be an investment that would make me more productive and lead to a healthier outcome.
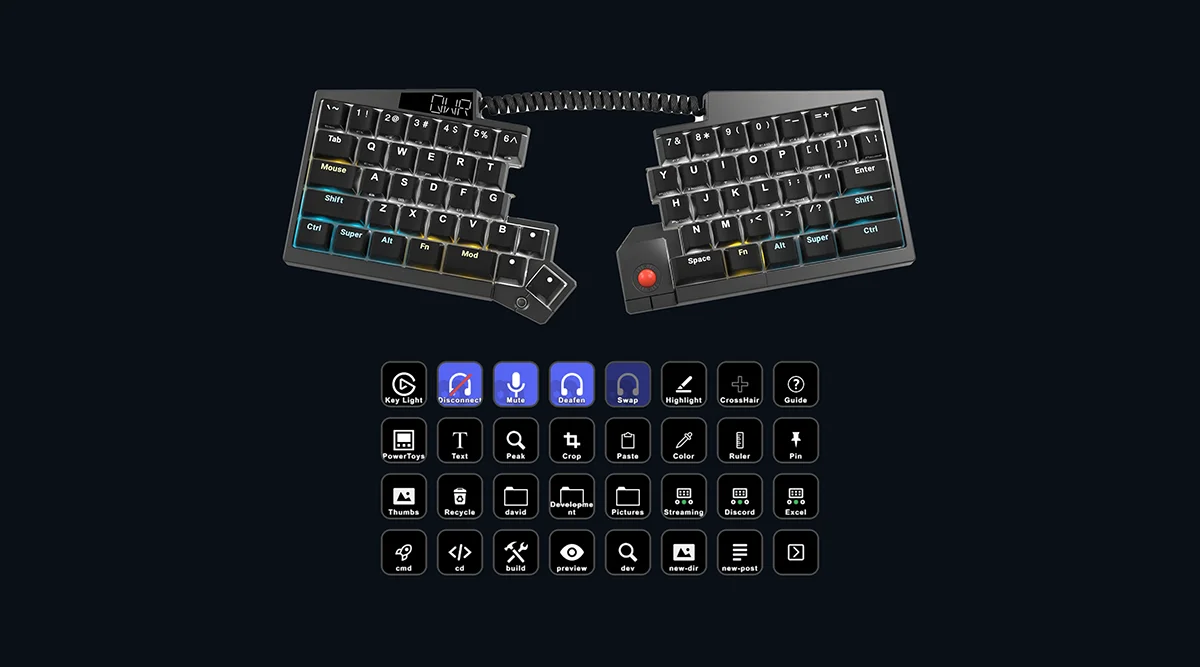
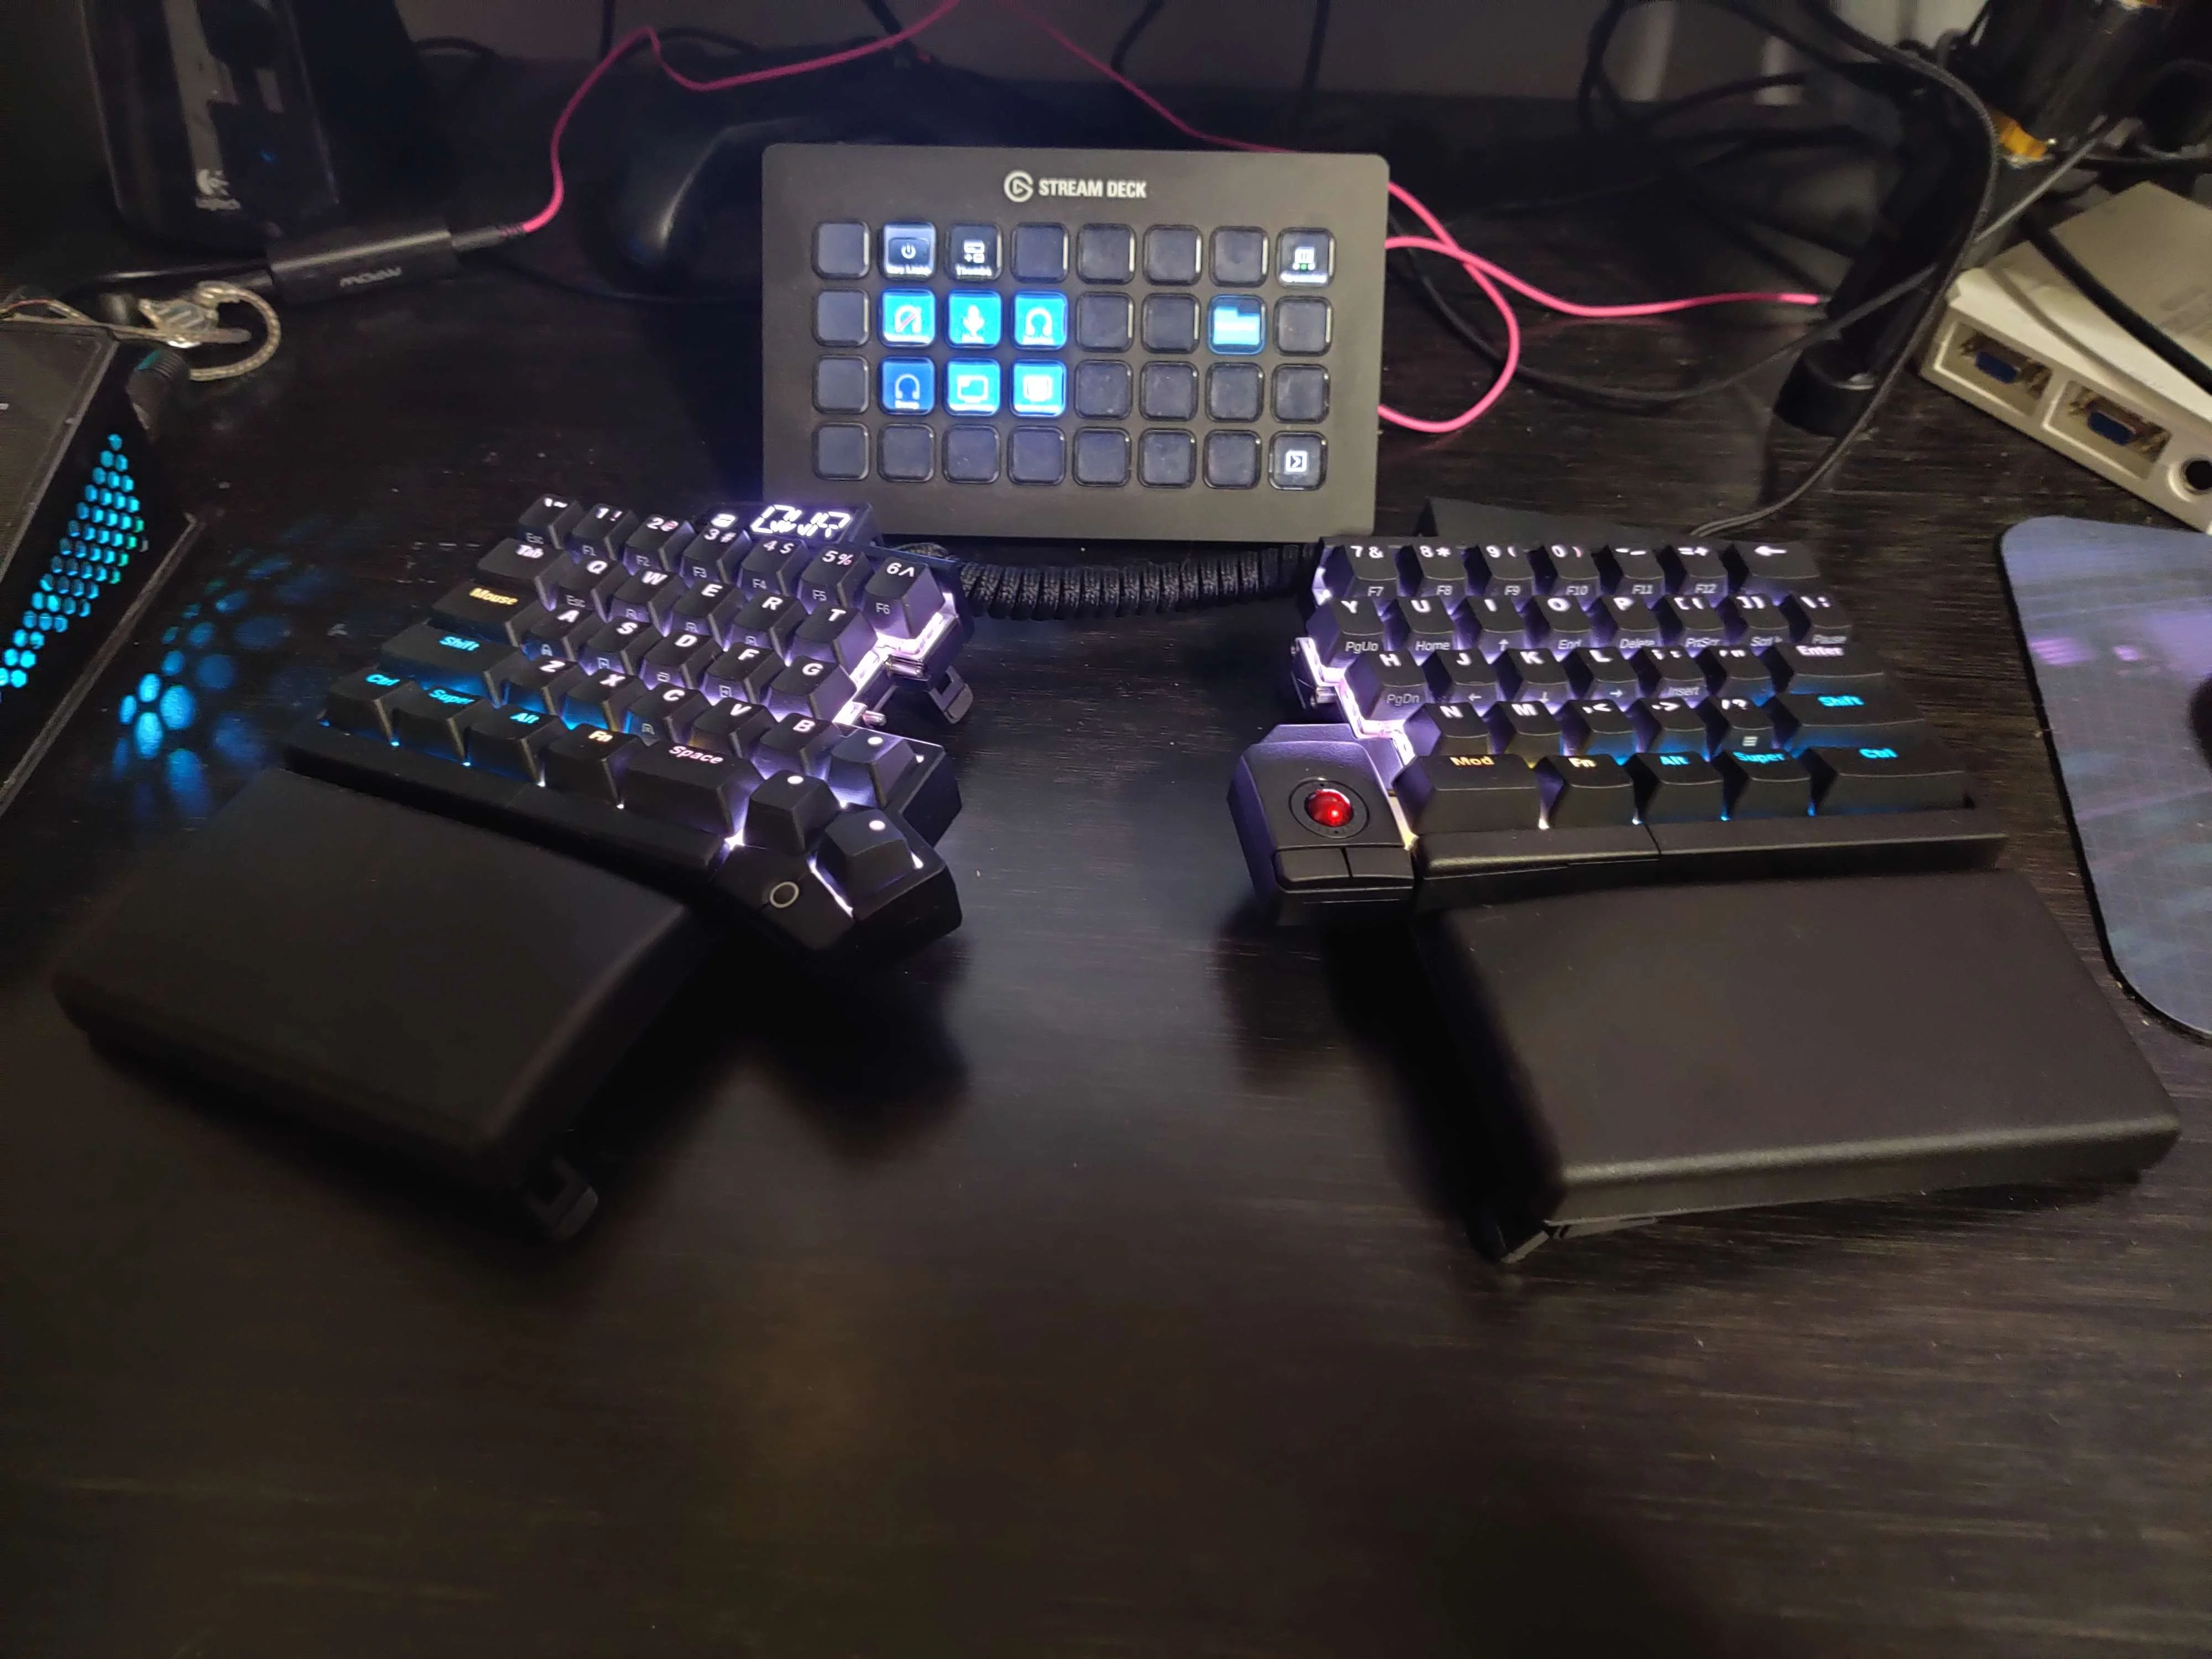
When I first set up the keyboard, I immediately swapped the Spacebar and Mod keycaps. Here’s a photo of it the day it arrived, you can see the Stream Deck there also.
The First Set of Layers I Used
I started with a basic layer that mimicked the default UHK layout (aside from swapping the Spacebar and Mod keys). Initially, I also used the Mod layer essentially as-is with its default keybindings.
If I held the Mod key, it would unlock an entirely new set of keys available to me in the Mod Layer I was able to configure with the UHK Agent PC software.
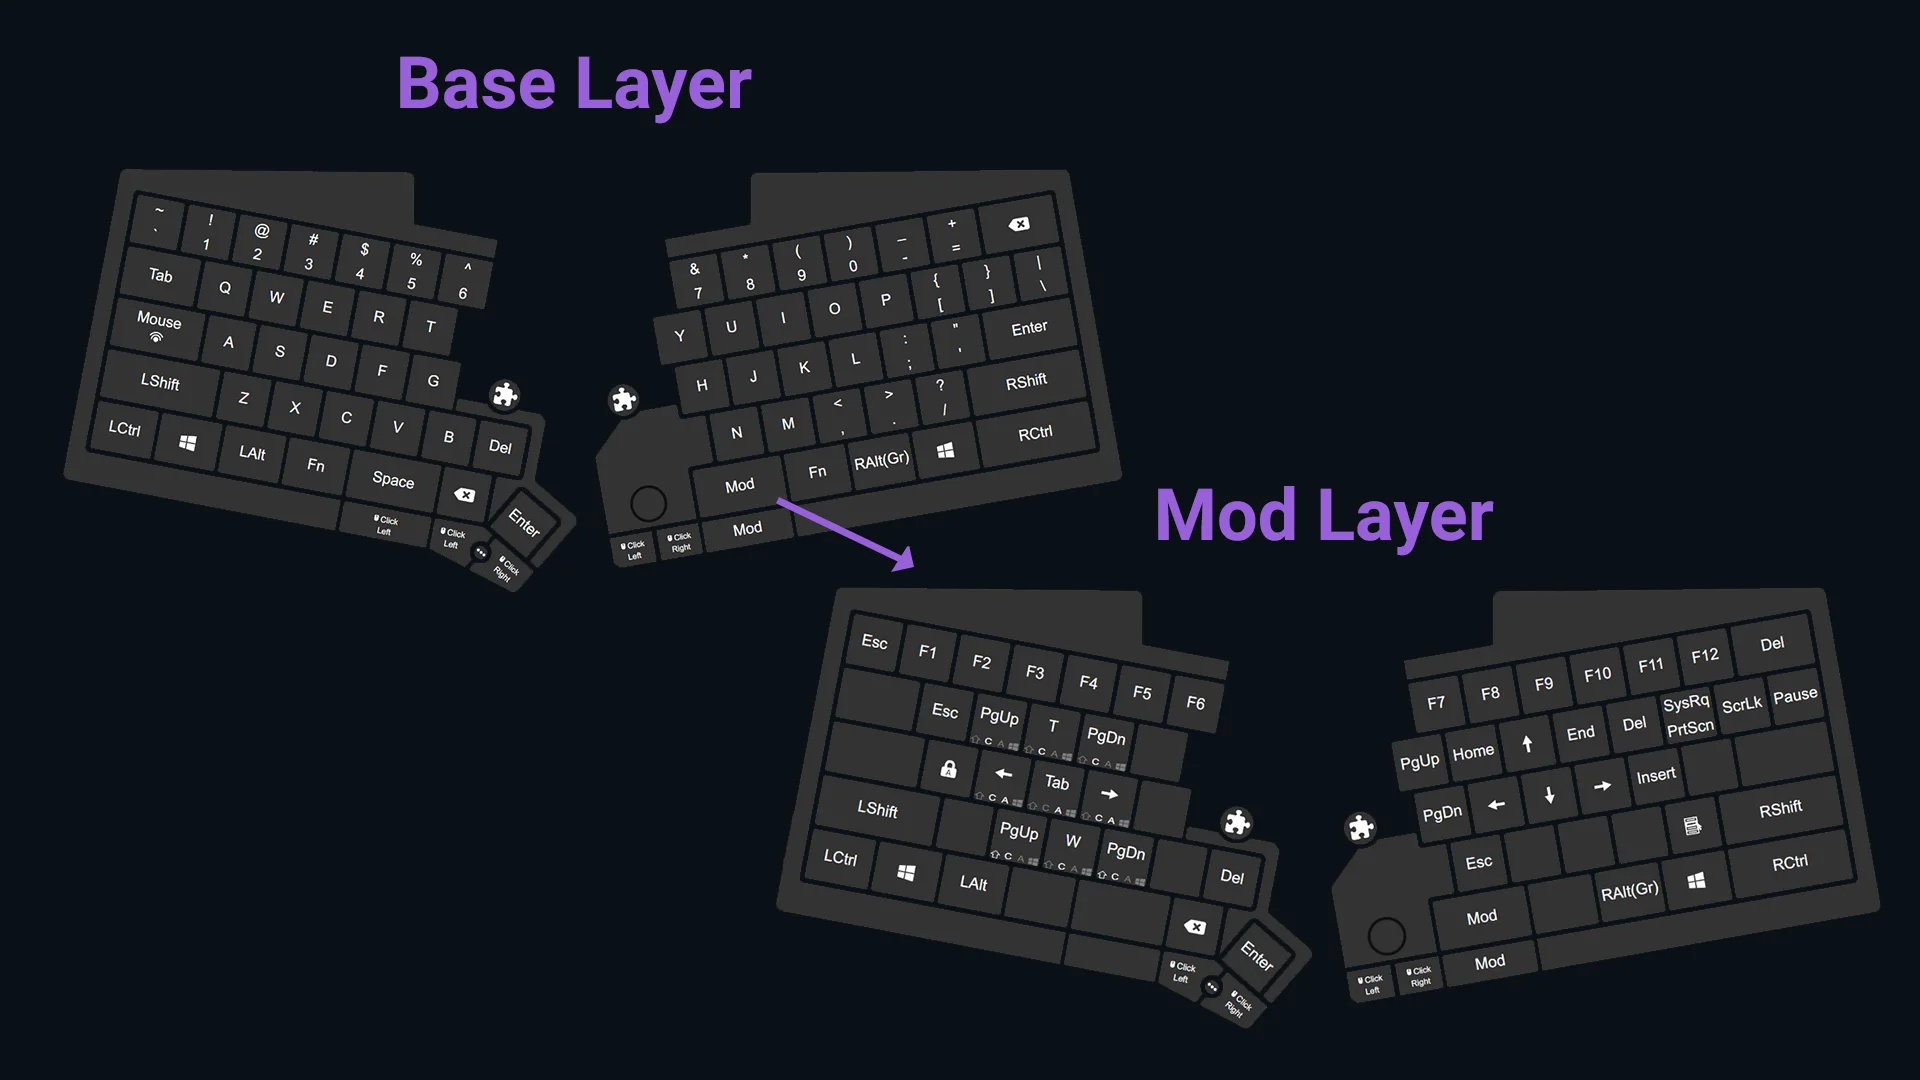
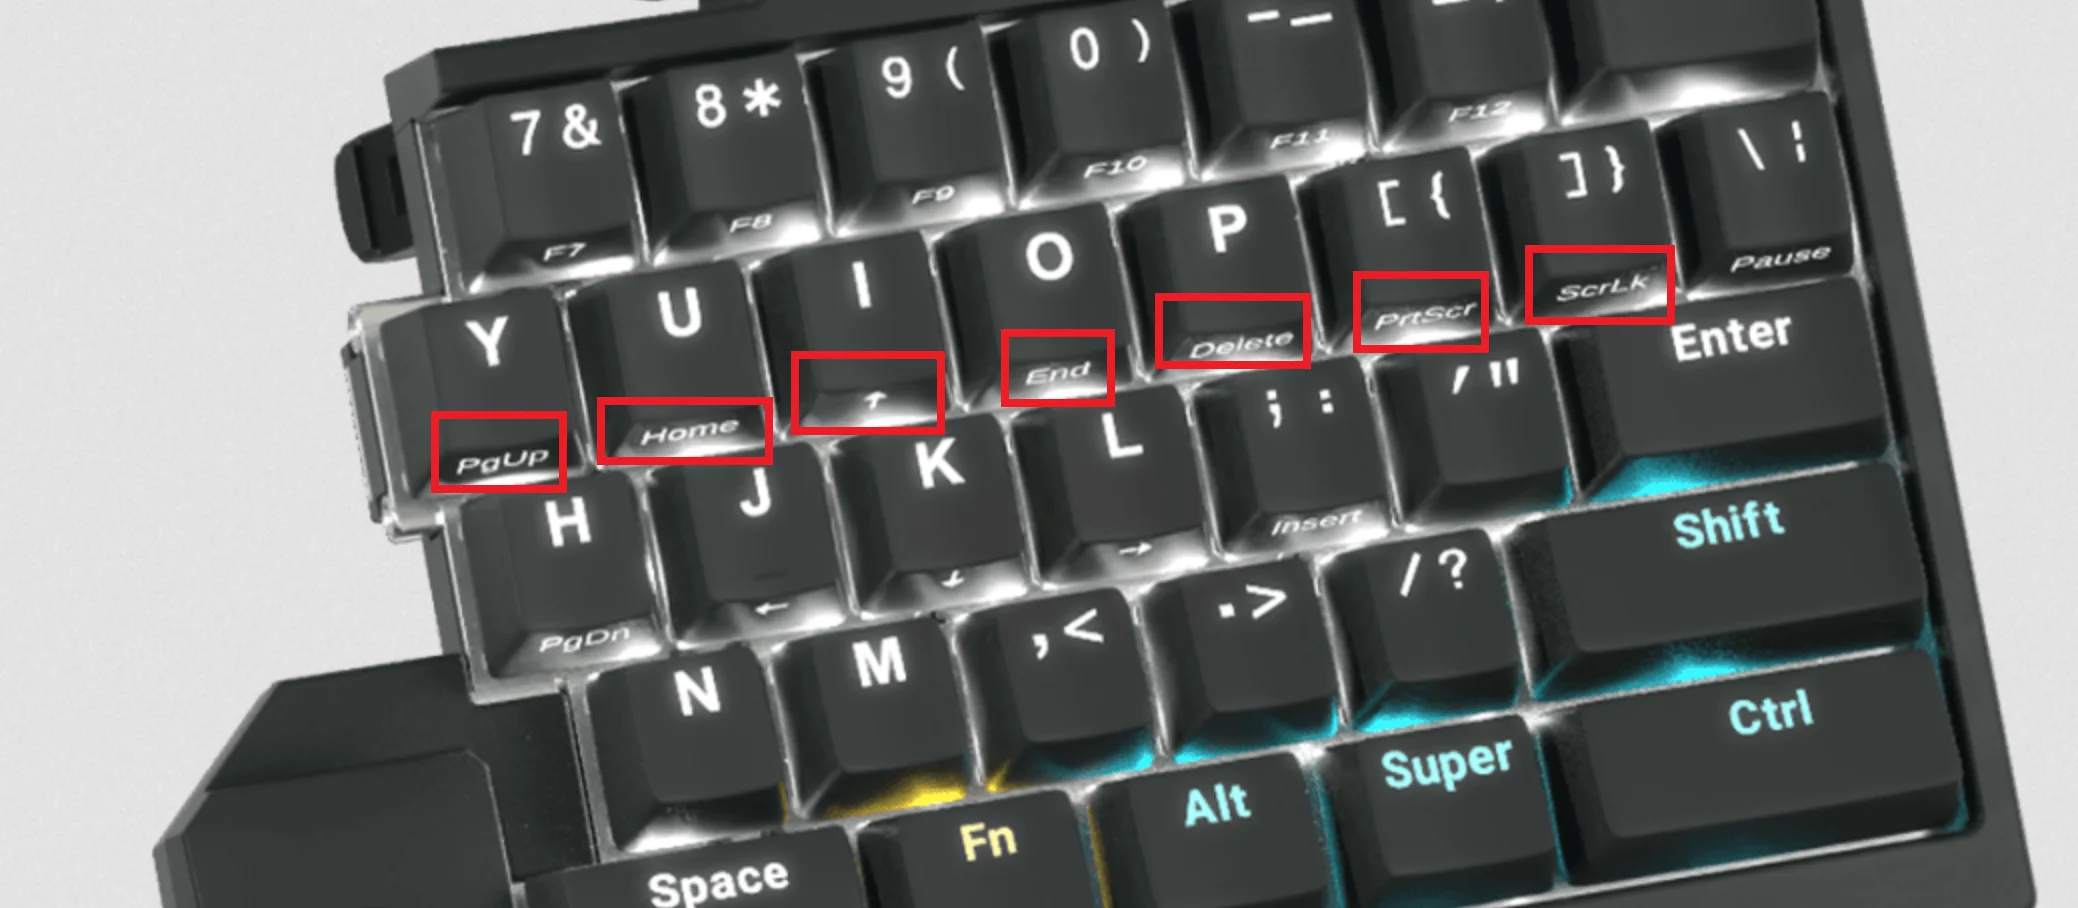
What I also appreciated about the keyboard right away is that there was space on the side of the keycaps to indicate Mod layer functions for that same key.
But even after just 1 day, I decided to switch things up, as you can see from my Discord message here:
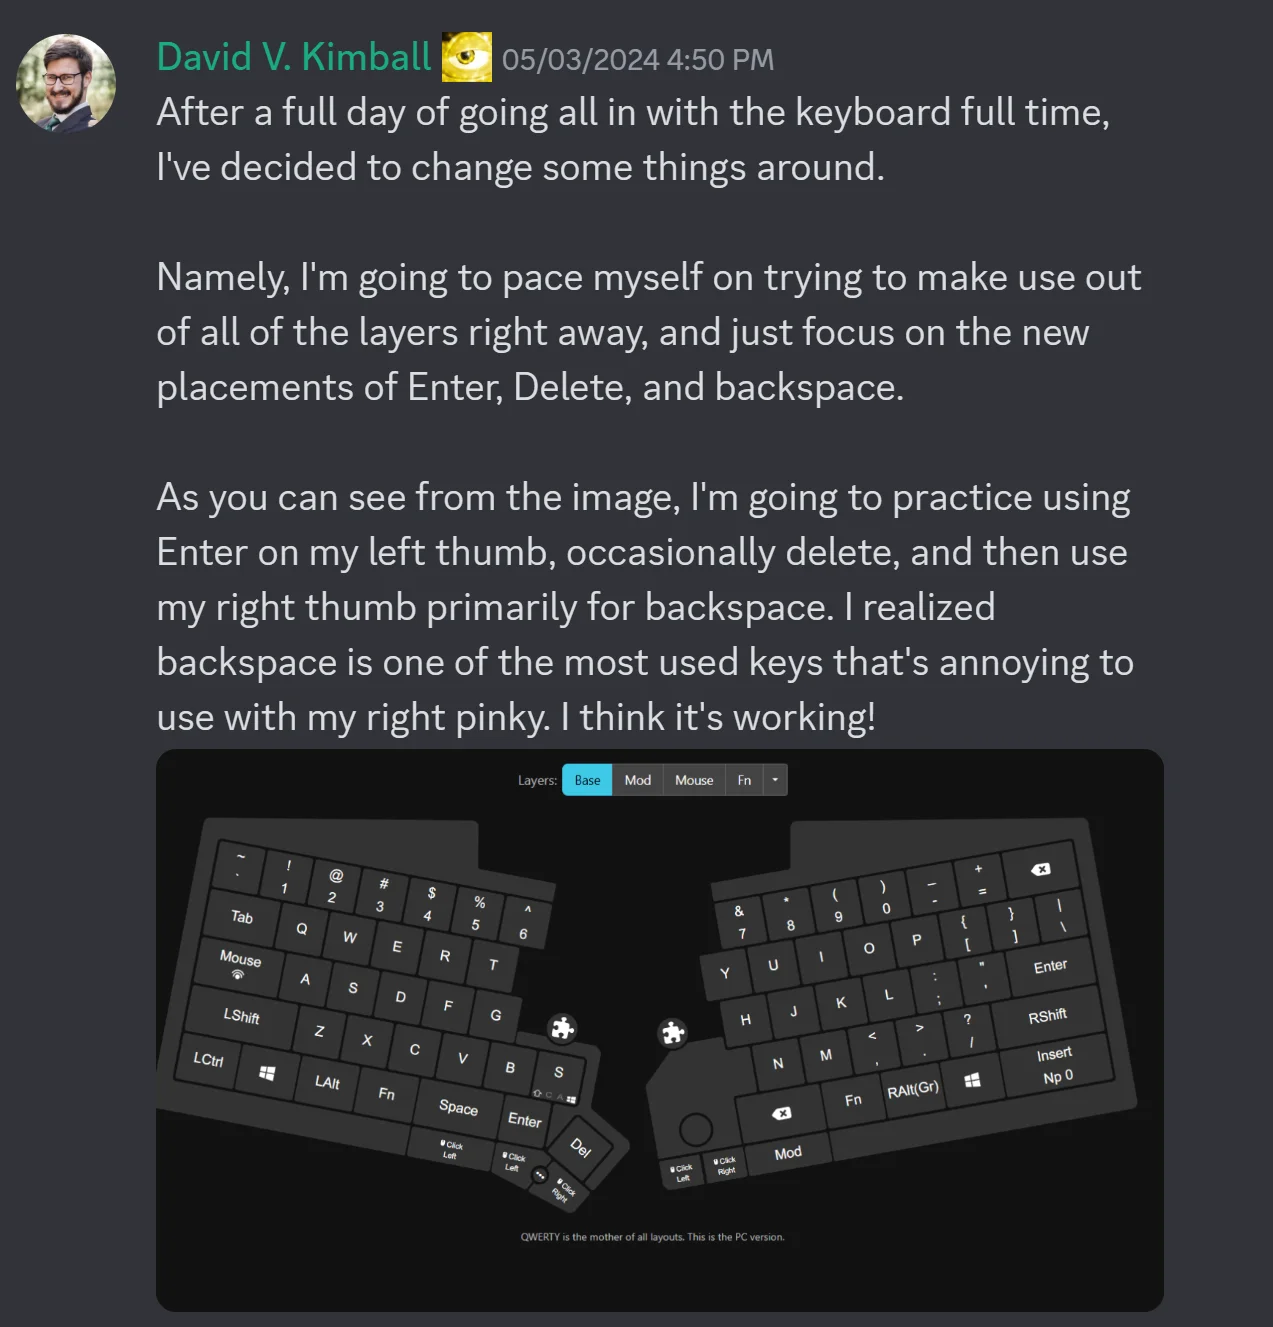
The first thing I wanted to put to use was my right thumb. So I assigned the Mod key to Backspace instead, and used the right case key just below it for the mod layer instead (this didn’t last long though).
How Long It Took to Feel “Normal”
It took about two weeks for the split keyboard to feel completely normal. For the first few days, angling my hands felt a little odd as I adapted to the new layout and experimented with rotating each keyboard half independently. Interesting, learning to use my thumbs for different functions was not nearly as difficult as I thought. After consistent use and some practice with typing tests like keybr.com, it became second nature and I was back to my standard words per minute and accuracy.
You can check out my experience typing on this keyboard via my keybr profile:
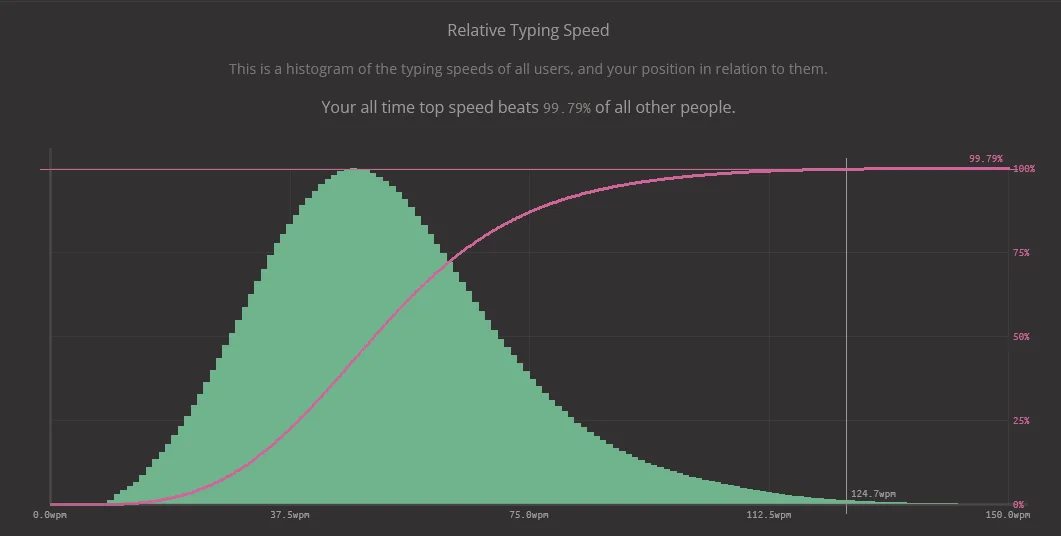 I actually outperformed my usual speed and accuracy on my previous keyboard, which was about 95 word per minute and 95% accuracy. By day 2 I was at 129 word per minute and 99% accuracy!
One Month In
About 30 days into using it, I wanted to make a couple more tweaks. So I purchased some new key cap set, some OS key caps, and a riser.
Do not tent your keyboard an extreme amount to start. Start shallow.
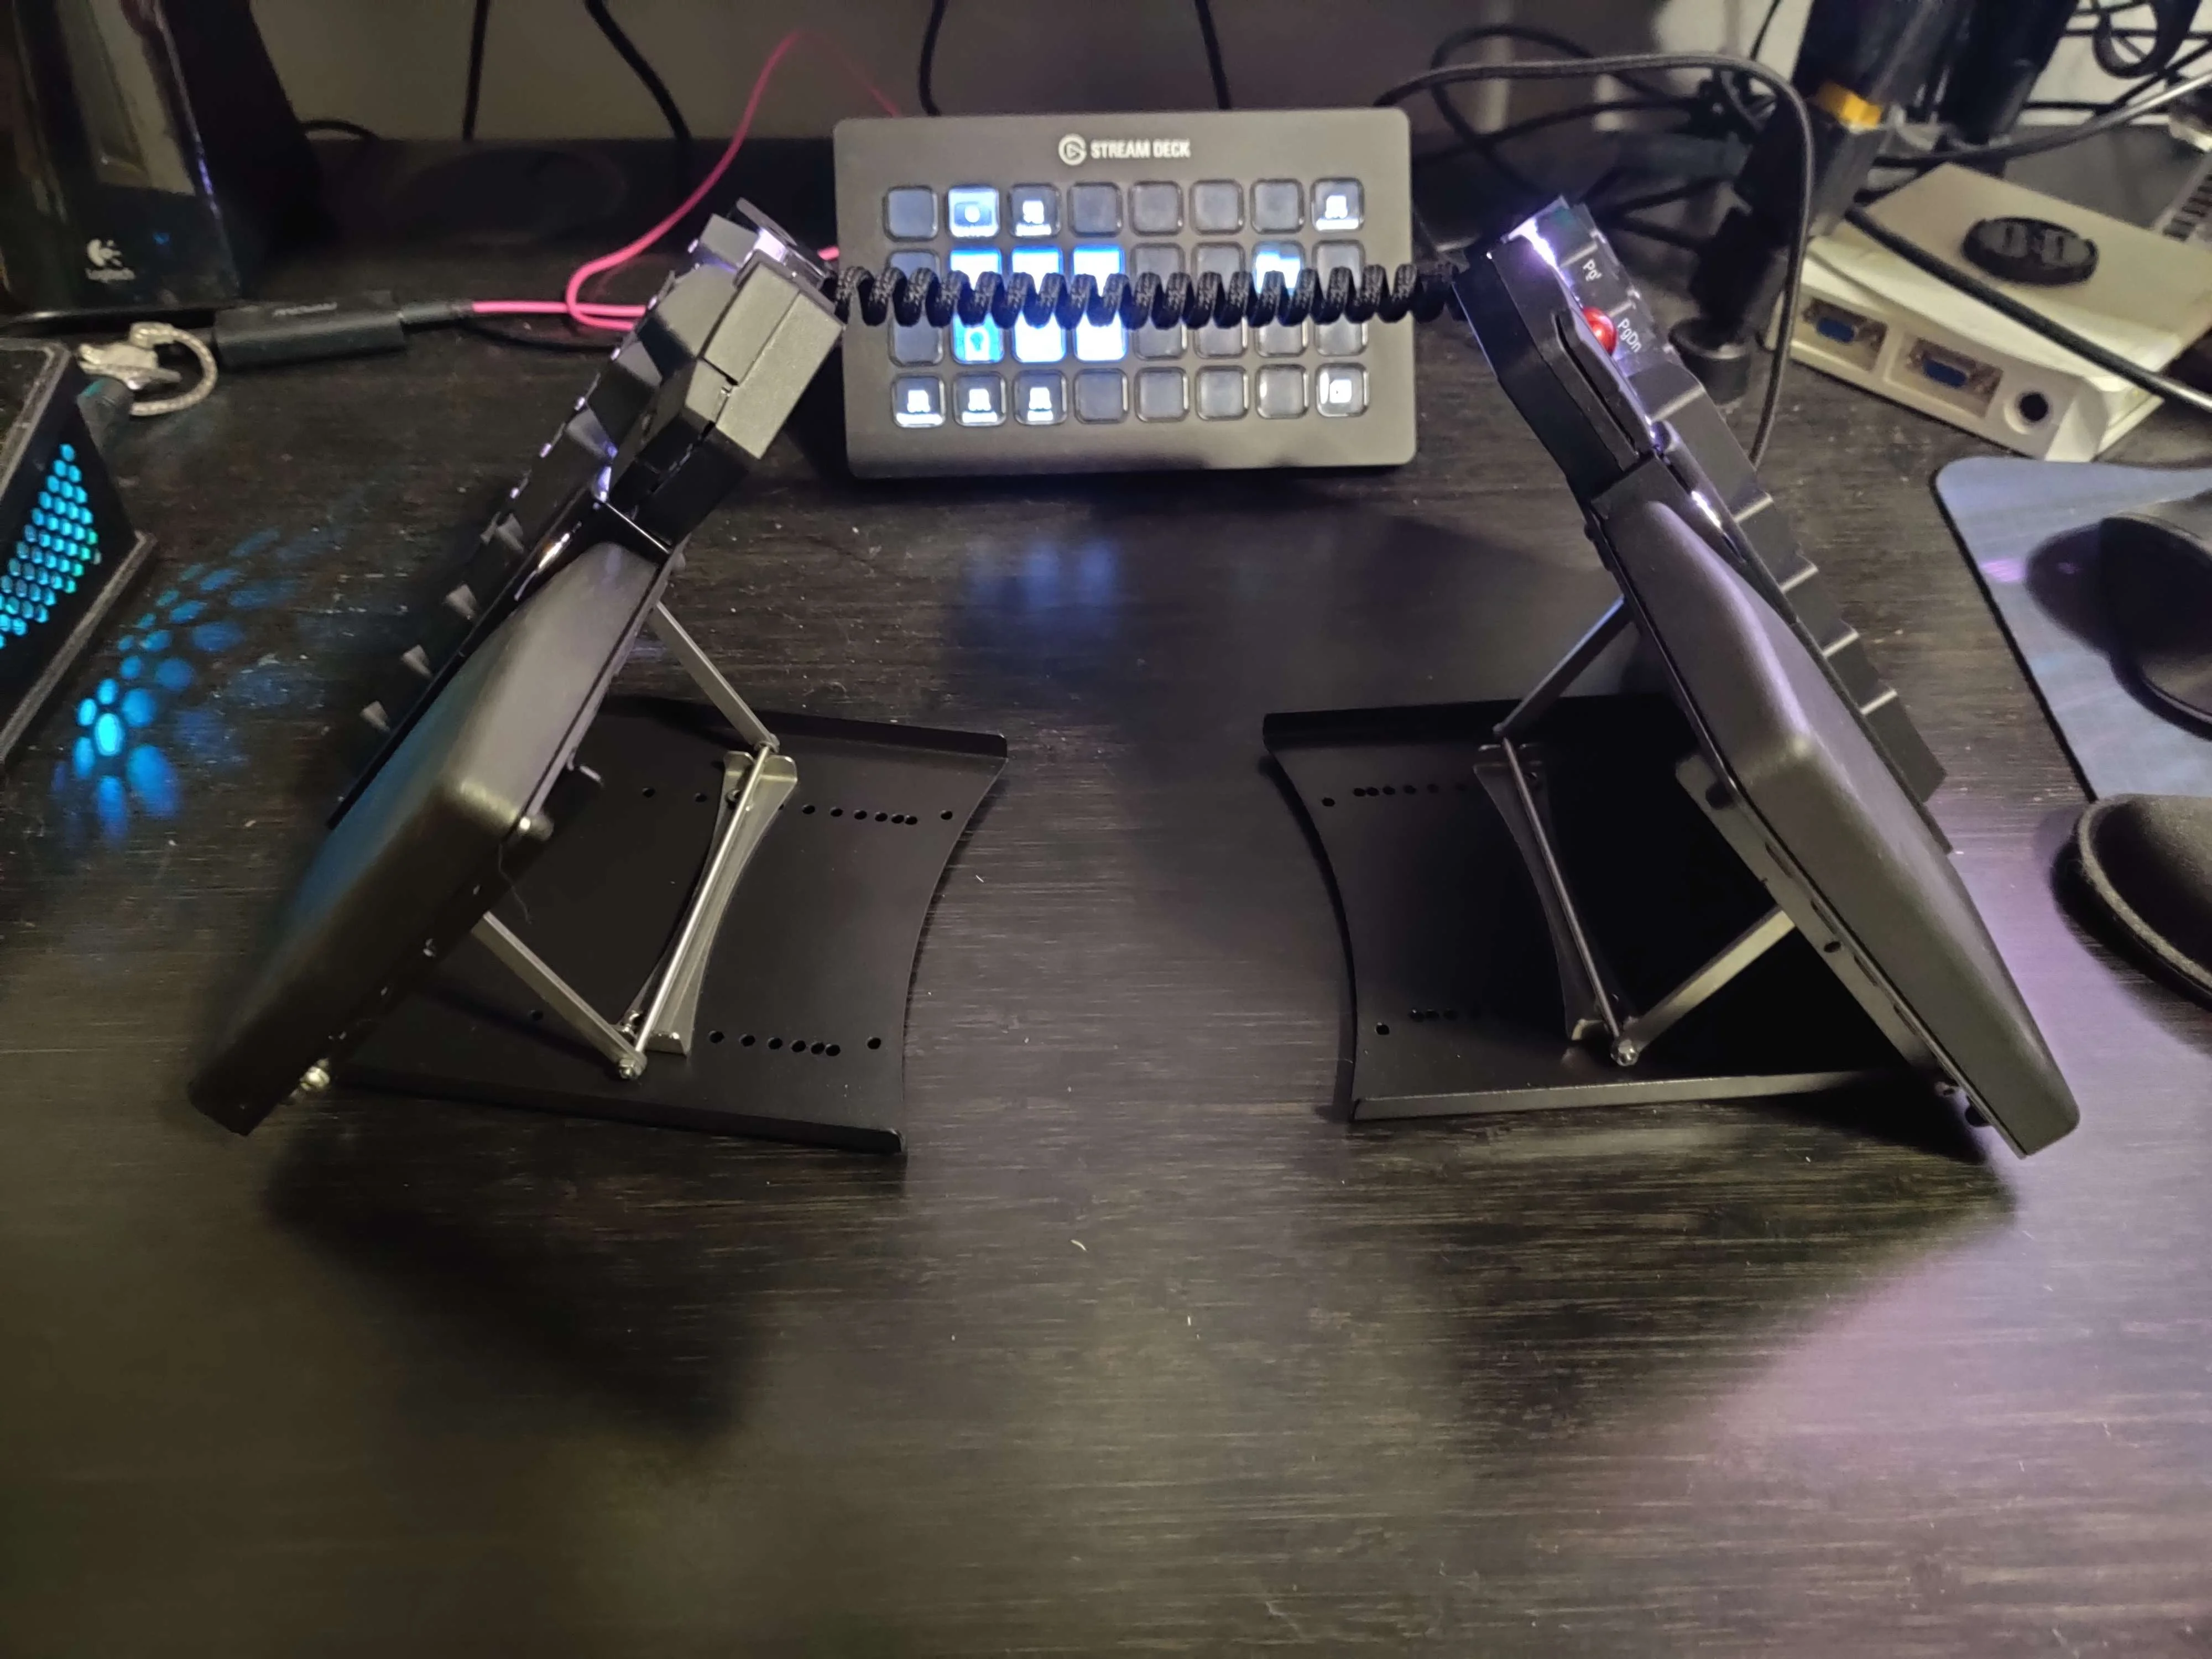
Theoretically, the more of a “handshake” angle your hands are, the less strained your arms will be. But if you’re not use to it, keyboard angled rising can feel very awkward. So I recommend a more conservative angle to start.
What I Miss from a Traditional Keyboard
Honestly - nothing. When I’m not at my desk, I still use my Surface Laptop 4 (especially for travel), and while it’s a great device overall, going back to the traditional keyboard layout is just a downgrade. I find myself occasionally using my right thumb to try and backspace - but assuming your setup isn’t too unorthodox, overall you should be able to differentiate muscle memory between traditional and split and function just fine.
Quite frankly, even if you aren’t ready to jump full-on into split keyboard territory, I suggest you at least get a mechanical keyboard. I promise once you try a better keyboard, you’ll start going down the winding trail of new layouts soon enough!
My Current Setup
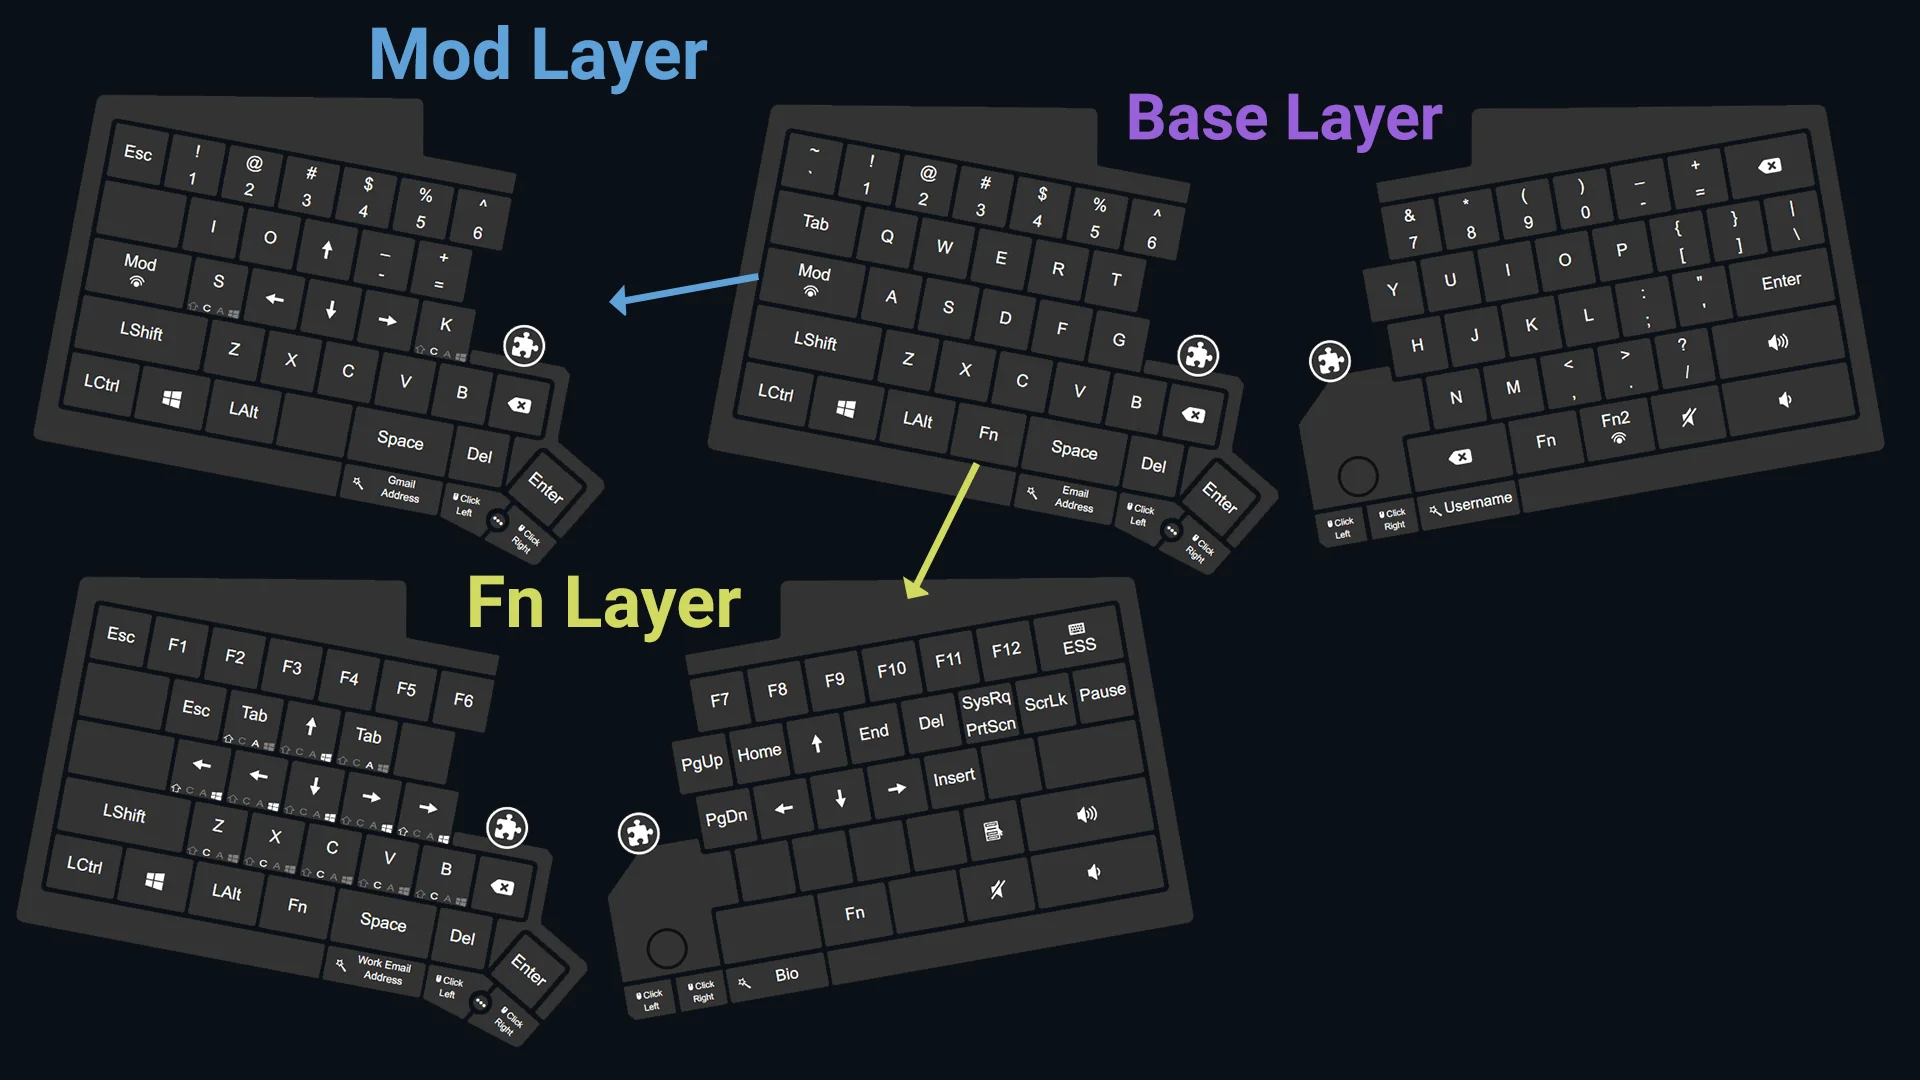
Currently, my setup includes several customized layers and macros. Here’s a breakdown:
- Base Layer: Standard QWERTY with minor adjustments for volume control keys and a couple of macros to type my email address and username. I never used the right
Shift,Ctrl, orWindowskeys, so replacing those was an obvious choice. And making use of the case keys was fun for the macros. - Function Layer: Essentially has replaced the Mod layer for me entirely. I like it because of the convenience of the
Fnkey on both sides of the keyboard, so it’s within reach with either thumb. Most used on this layer are the arrow keys on the right, but alsoEsc, and theWinKey+ directional arrow shortcuts for manipulating windows quickly. I want to eventually get used to usingFn+Z,Fn+X, etc. instead ofCtrl+Z,Ctrl+X, etc. to give my left pinky a break from holding downCtrlandShiftso often. But that’s down the road. - Mod Layer:
Modkey is now where theCaps Lockkey normally is, I use this for video editing. Most-used editing shortcuts are mapped as shortcuts on my left side, so my right hand can just be on the mouse. I can double tap theModkey to have it “lock” into theModlayer, and double tap to return to normal - or just hold the key down for a quick one-off key use. - Left thumb key cluster (all layers): The way I set it up gives me easy access to
Delete,Backspace, andEnterkeys. Using my thumbs forDeleteandBackspacehave become second-nature, especially with theSpacebar. In additional to usingEnteron the cluster, my right pinky has gotten a nice a break from overuse ofBackspaceandEnterin all of the Discord and Slack messages I send. I currently don’t have this customized for each layer yet, since I want to still just get used to using the cluster as-is, but down the road I may customize the cluster on a per-layer basis as well.
If this all seems complicated to you - you may be surprised to hear this is barely scratching the surface of what’s possible, and quite conservative change-wise compared to many UHK power users.
Something I’m still figuring out is the Trackball module - I very rarely use it and again, wish it was just another key cluster. That being said, being able to move the mouse and click around without leaving the keyboard is nice once and a while, and the left cluster has a smaller trackball for scrolling on webpages which comes in handy sometimes.
I also haven’t used the Mouse layer much - something many on the UHK Forum swear by. Maybe I’ll give it another shot down the road.
Combining It with Stream Deck XL
Integrating the split keyboard with a Stream Deck XL has been a game-changer. I use the Stream Deck for additional macros and functions so I didn’t have to over engineer my keyboard. It’s also nice if I want a visual indicator and not have to memorize a modifier key + standard key combination.
It sits conveniently between the two halves of the split keyboard and fits there perfectly. Here’s a screenshot of the pages of my layout:
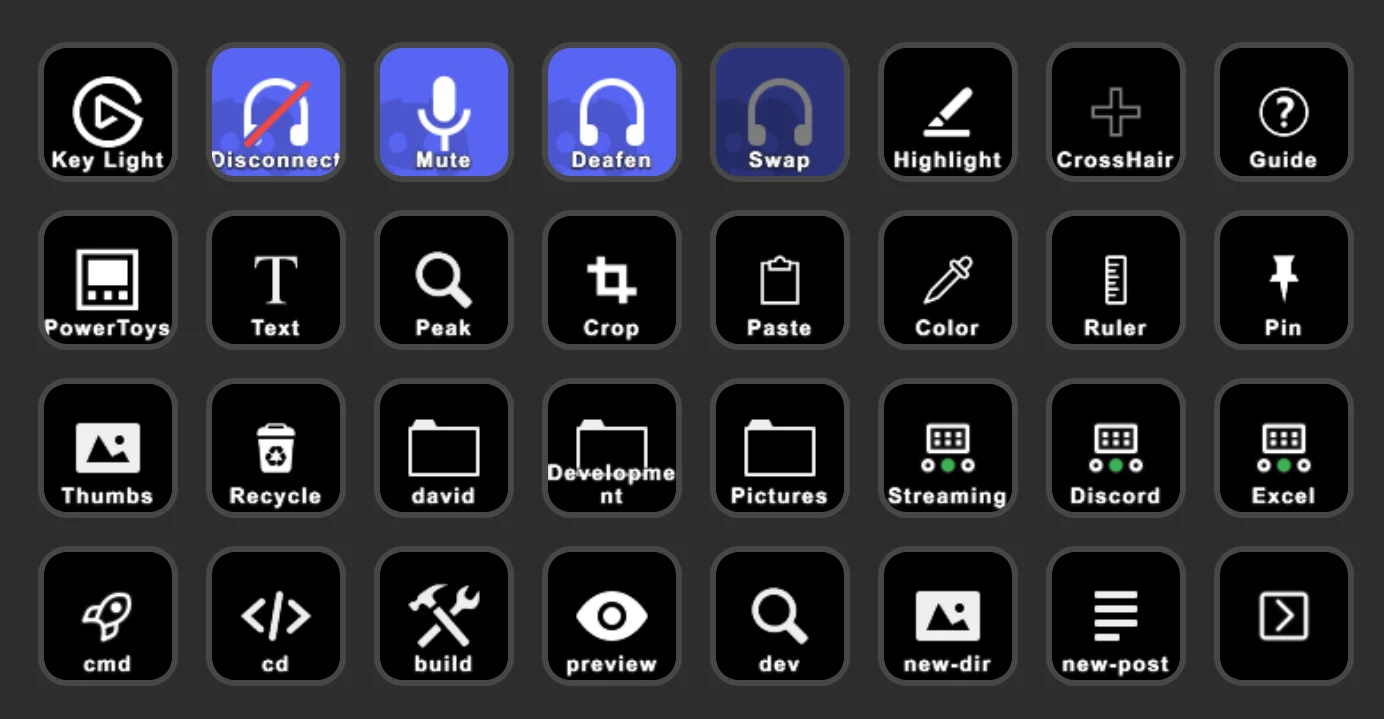
Many of these I assign to Shift + F13-F24, and are Microsoft PowerToys utilities.
I will make a blog post outlining how I use this for daily PC use and for streaming, but for now you can just imagine the possibilities.
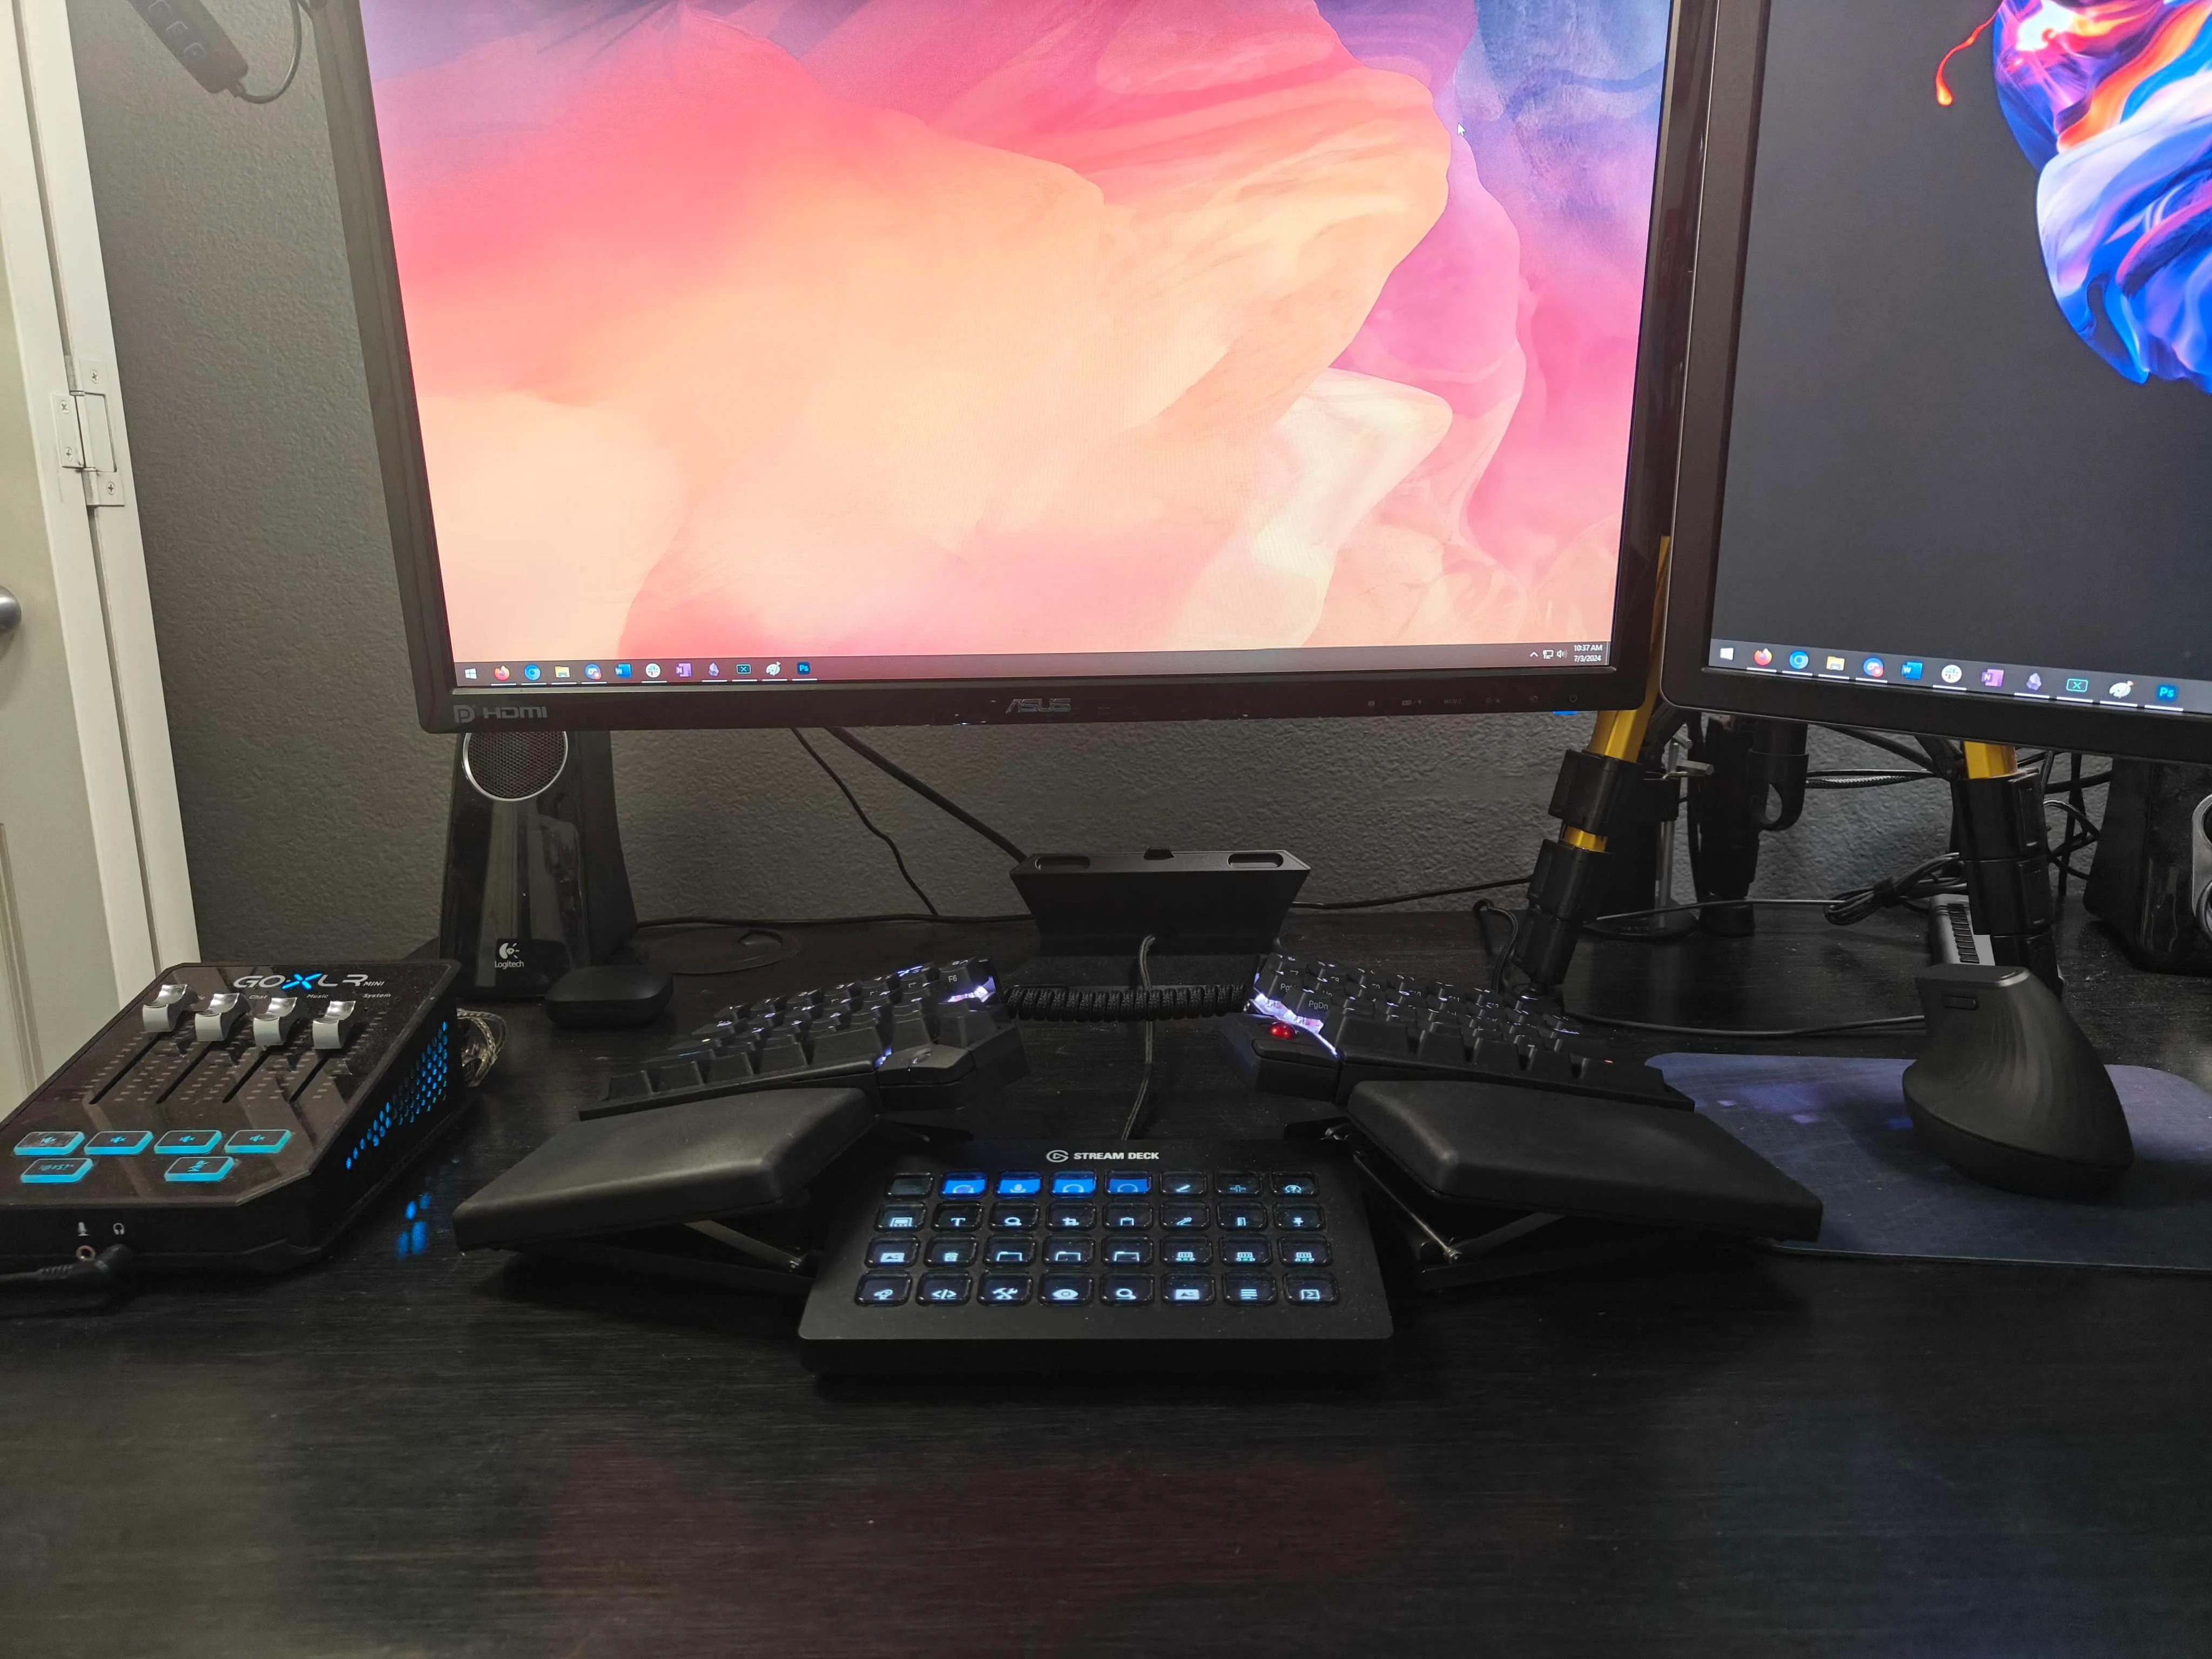
Combining It with an Ergonomic Mouse
To further the legitimacy of my ergonomic setup, I paired the keyboard with a Logitech MX Vertical ergonomic mouse. I upgraded from the Logitech Triathlon (at the time hesitant to change from a wired to wireless mouse) and while it served me well, this was definitely an upgrade. Not having to rely on replacing batteries and the ability to recharge it, plus the addition of a handy top button are two improvements I enjoy aside from the unique ergonomic design.
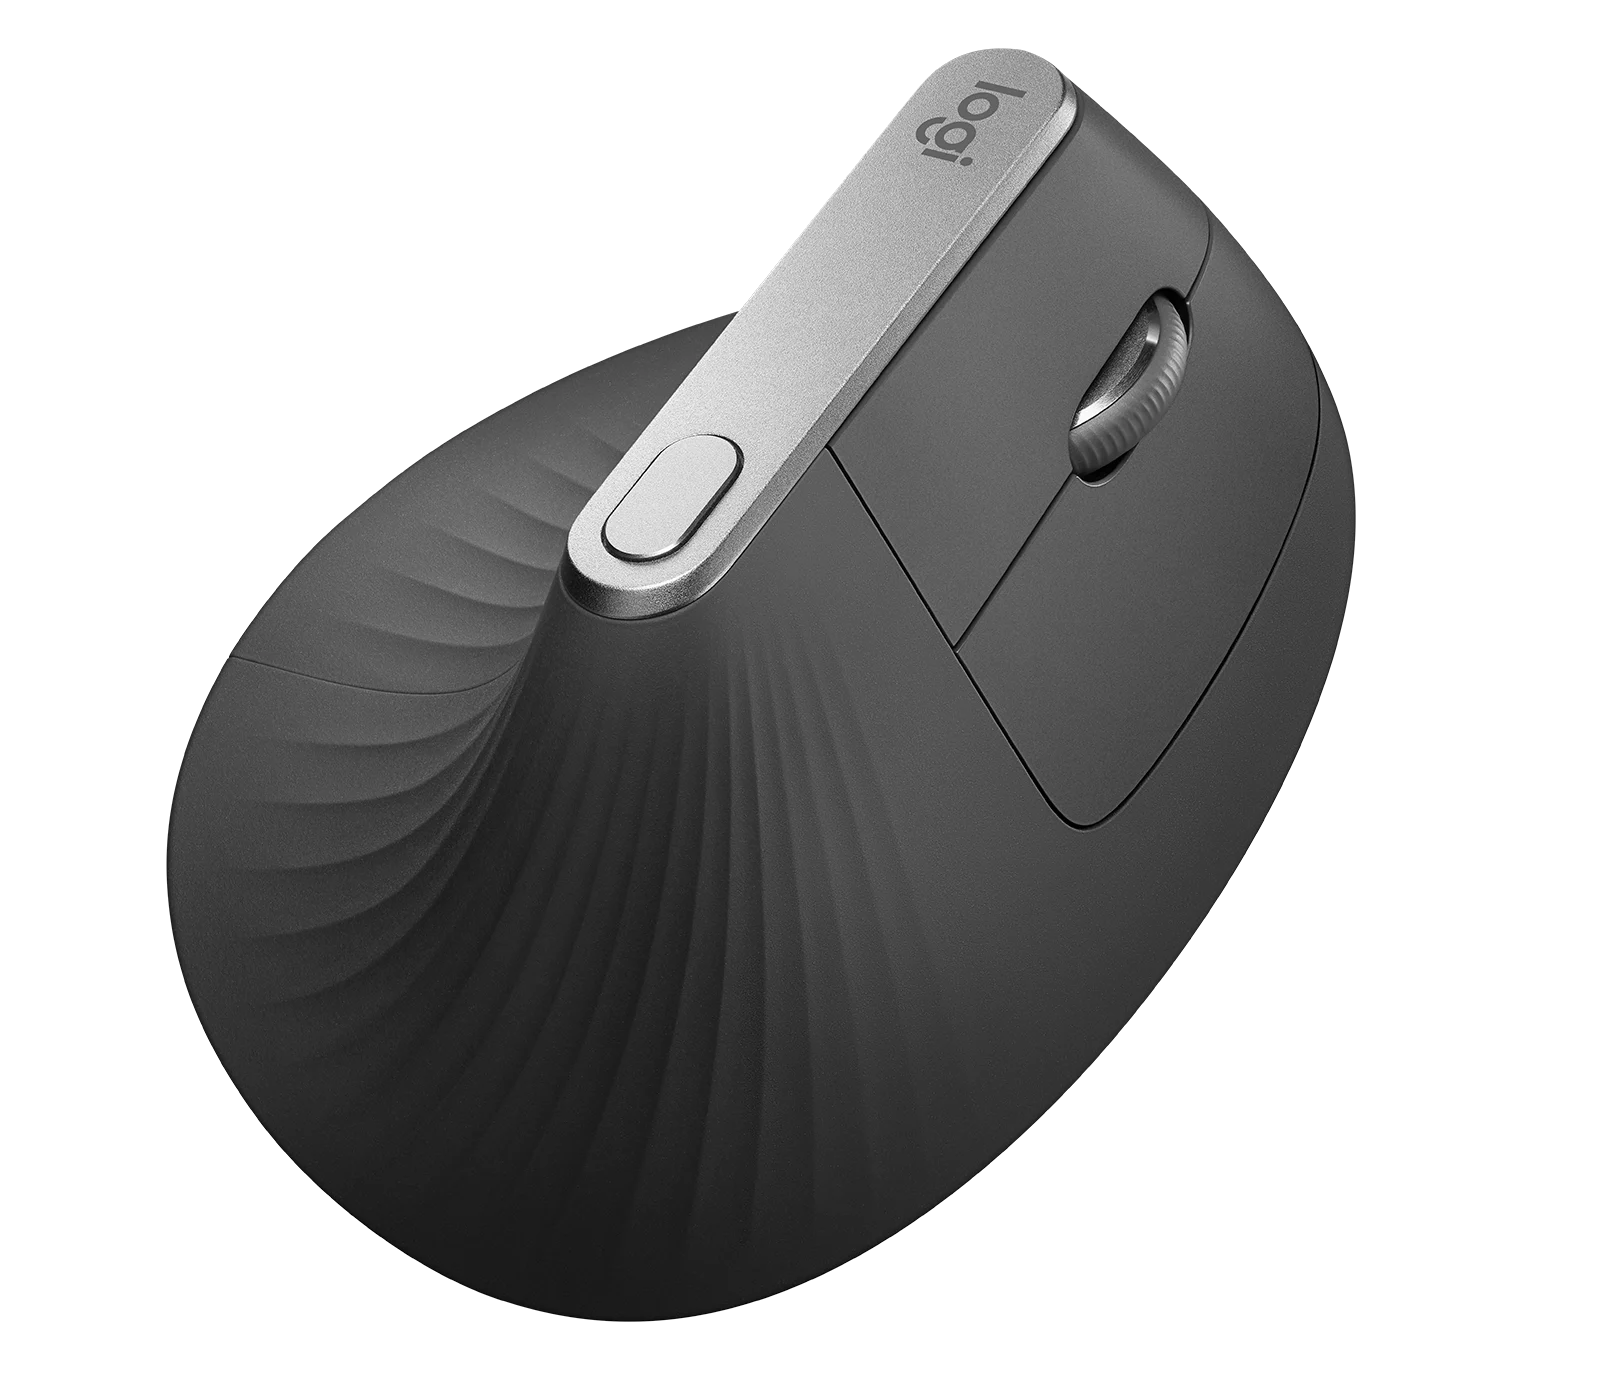
The combination of mouse and keyboard ergonomics has significantly reduced strain on my wrist and improved my overall comfort during long working hours. When paired with a standing desk and a good chair - it’s the home office dream!
Bottom Line
Switching to a split keyboard has been a worthwhile investment in my health and productivity. It took a shockingly short time to adjust, and the benefits of reduced strain and increased functionality have made it a valuable part of my daily workflow. If you’re considering making the switch, I highly recommend it for anyone who spends a significant amount of time typing each day. That being said, a few words of caution and some recommendations.
Spit keyboards are not for everyone
Just because I’ve had a great experience doesn’t mean everyone will! If the idea of a split keyboard sounds interesting for you, then pursue it. If the idea baffles you, you should probably avoid it.
Do not overwhelm yourself with layers, macros, and shortcuts.
Once you get a keyboard like this, it will be tempting to try and optimize every little thing day 1. However, do not fall into this trap. Mostly because if you try to change everything at once, you won’t be able to gradually learn to use them and will just not use any of it.
Try changing just one thing at a time.
The key is to start with small changes and work them into your typing habits and muscle memory until it becomes second nature. Then once you have that done, gradually incorporate new functionality until you have the ideal setup for your use case.
Experiment with training wheels or imposing limits on yourself to curb old habits..
Something that helped me unlearn using a key a certain way was to just disable it so I had to use the new one. For example, I disabled the standard Enter key until I used it on my key cluster instead. But once I was done, I turned back on the standard Enter key so I had the option of using both, and each are helpful in its own context - and thankfully I’m just as comfy using both now!
Functional changes you make to your keyboard work on the hardware level and do not require software.
UHK Agent software makes changes to your keyboard’s firmware, meaning any macros, shortcuts, or key behavior updates you make to your keyboard will work even if the PC you connect to doesn’t have the Agent software running.
If you’re interesting in getting a spilt keyboard yourself, there are a few others I looked at - the ZSA Moonlander and the lulu by Boardsource. Ultimately I didn’t go with either option mostly because of their ortholinear layouts. There are plenty of less expensive options out there, too, especially if you’re comfortable with soldering or doing a bit more building yourself.
If you enjoyed this review or have any questions, please give me a shout on your platform of choice! I’d love to hear your thoughts.
If you’d like, you can follow the journey I shared in my Discord server and see what our little community discussed about keyboards and macros we use.